Your home oxygen therapy prescription may include portable oxygen to help you move around the house, run errands, or travel.
Oxygen cylinders come in many sizes and might look a little different that what you see on this page, but they all work the same way. Here's how to use them.
Watch this video to see how to use a portable oxygen cylinder.
The Oxygen Cylinder Regulator
Cylinders use a regulator to control the flow of oxygen. Each regulator has:
- A control knob to set the oxygen flow rate
- A content gauge to show you how much oxygen remains in the cylinder
- An outlet port where the cannula is connected
Some regulators are designed to provide a continuous flow of oxygen. Others only deliver puffs or pulses of oxygen. These are called conservers. The type that you have is based on your doctor's order.
The Sealing Washer
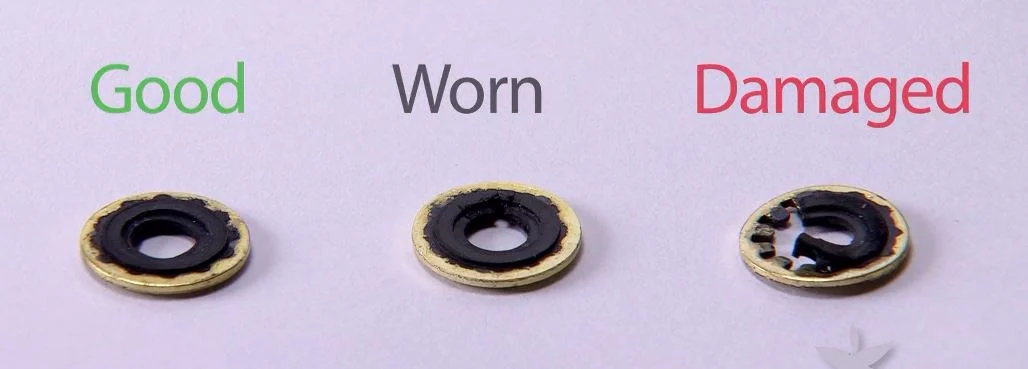
All regulators require a sealing washer. Always make sure that the washer is securely in place and in good condition before attaching it to a cylinder. Never use a sealing washer other than those provided by Apria.
A missing washer is the most frequent problem encountered when changing cylinders. If the washer is missing, deformed, damaged or broken, replace it before attaching a cylinder.
You should have received spare washers with your initial delivery. Your delivery technician or local branch can provide additional washers.

This image shows sealing washers in good, worn, and damaged condition. Sealing washers should be replaced when they are not in good condition.
How to Attach a Regulator to an Oxygen Cylinder
To ensure the safe and proper operation of your equipment, it is important to follow these steps every time:
- Remove the protective tape and slowly open the cylinder valve, blowing excess dust away from the opening. Make sure that it is not aimed at anyone.
- Inspect the regulator to make sure that only one clean sealing washer is in place before attempting to place it on the cylinder. If the washer is missing or damaged, replace it with one of your spare washers.
- Slip the regulator over the neck of the full cylinder. Line up the pins on the regulator with the holes on the neck.
- Turn the T-screw clockwise until it is hand tight. You don't need to use any tools.
- Attach oxygen tubing to the outlet.
How to Turn on the Oxygen Cylinder's Flow
To turn on your oxygen, follow these steps:
- Slowly open the valve by turning the top of the valve counterclockwise. Never open the valve quickly.
- If you hear excess oxygen escaping quickly, close the valve and check that the regulator is properly attached, and that the sealing washer is properly placed and in good condition.
- The needle of the pressure gauge will show you the amount of oxygen in the cylinder. A full cylinder shows approximately 2000 PSI on the gauge.
- Set your regulator to your prescribed flow.
- Fit the nasal cannula or the oxygen mask so that it's comfortable.
Make Sure You Have Enough Oxygen in the Cylinder
Please monitor the content gauge to make sure you have an adequate supply of oxygen to support the time you need it in the home or while traveling outside your home.
Your patient instruction booklet contains information on how long your tank should last based on your liter flow and tank size. Refer to the oxygen cylinder supply times chart in your patient instruction booklet.
How to Turn Off the Oxygen Flow
Here are the steps to follow when you are finished using your oxygen:
- Remove the cannula or mask.
- Close the cylinder valve by turning it clockwise until hand tight. This stops the flow of oxygen.
- If your regulator is equipped with a flow meter, when both the pressure gauge and the flow meter register zero, turn the leader control knob counterclockwise until it is hand tight. If your regulator does not have a flow meter, when the pressure gauge registers zero, turn the leader control knob counterclockwise until it is at zero.
Replacing Empty Oxygen Cylinders
If you need to replace your cylinder after turning the unit off, loosen the regulator at the T-screw and remove the regulator by lifting it up over the cylinder. Then, install the regulator on the new tank as described above.
Your Apria delivery technician will exchange empty or used cylinders for full ones on a regular schedule. Most patients are placed on a regular schedule for their deliveries. However, if you feel that your oxygen supply will not last until your next delivery, please call your local Apria branch at least two days before the date you expect your supply to run out, so that your branch may change the date of your delivery.
Oxygen Cylinder Safety Precautions
Oxygen is generally safe to use at home, but it must be used and stored properly to avoid problems. Safe cylinder storage is one of the most overlooked safety measures.
How to Store Oxygen Cylinders at Home
- Store them lying down, unstacked, or upright in an oxygen cylinder, base cart, or rack. Your local branch can help you obtain a cylinder rack.
- Do not store them in an enclosed or unventilated space, such as a closet
- Cylinders must always be secured. If upright, they must be secured from falling. If lying down, they must be secured from rolling.
- When storing cylinders under a bed, make sure the area is well ventilated and the bedding does not extend to the floor. Be sure that the cylinder is positioned far enough under the bed to avoid injury.
How to Store Oxygen Cylinders in a Vehicle
- Be sure that your tanks are always secured so they cannot move.
- Cylinders may be stored either lying down, unstacked, or upright in an oxygen cylinder storage rack.
- Leave at least one vehicle window partially open for ventilation.
- Neither you nor your passengers should smoke in the vehicle at any time.
- Do not store oxygen in the trunk or in an unattended vehicle.

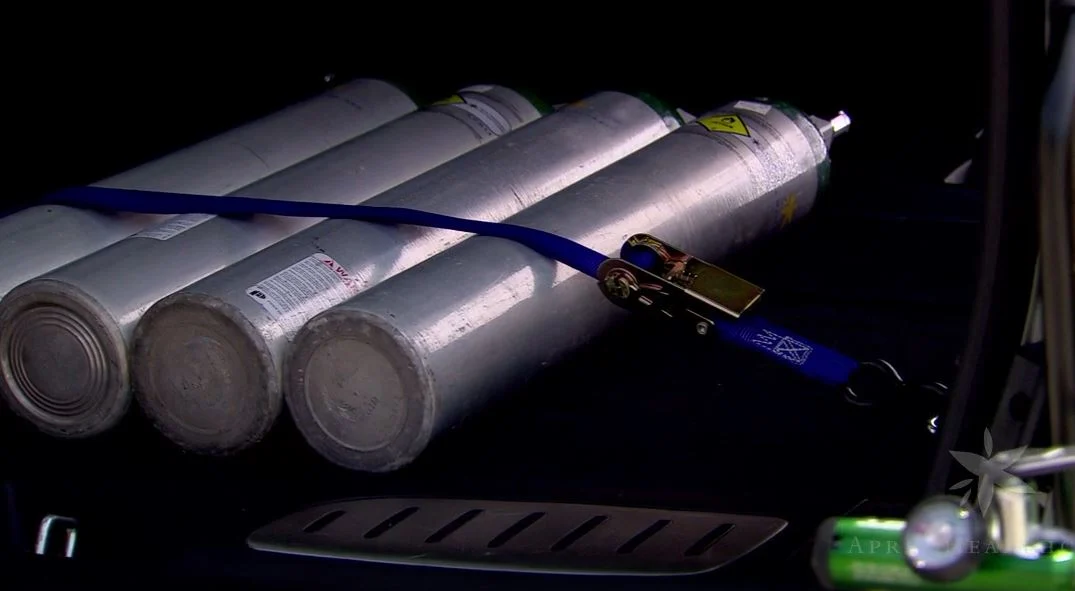
This is the correct way to store oxygen cylinders in a vehicle. They should be lying flat and secured.
Additional Oxygen Safety Tips
- Never store oxygen near gas or open flames.
- While using or carrying oxygen, be sure to always stay at least 5ft away from open flames.
- Do not store oxygen in an area where the internal or external temperatures are above 120 degrees Fahrenheit.

.png)


.png)
